Strange Journals
Ramblings on Bookbinding, Photography, Journaling and ArtField Notes Upclose
So what are these things anyway and why have they developed such a cult following? Well, in terms of the form factor their nothing special, 3 1/2″ X 5 1/2″ same size as Moleskine Cahiers. Unlike Moleskine’s their stapled and not stitched and the covers have been offset printed with their logo, and a gentle reminder that Filed Notes are made in the U.S.A. They’re a little thinner than my homemade ones, probably because the paper I’m using is a little heavier. Field Notes uses a 50 Lb. text while I’m using a 60 Lb.
The printing inside the front cover provides a place for you to jot down some personal information so your book can find its way home if it gets lost. The rear cover includes the back story for the books, a list of “Practical Applications,” and the books specifications, the paper, the ink and the printing processes that were used.
The paper used in these notebooks is Boise Offset Smooth 50 Lb. I wrote on the first page with a variety of pens and inks to see how it would hold up. From top to bottom, a Faber Castell Ambition with a fine nib and Noodler’s Habenero, a Lamy Safari with Noodler’s Gruene Cactus, A Lamy Safari with Pilot Iroshizuku Yu-yake, a Lamy Safari with Pilot Iroshizuku Syo-ro. Next a few standard pens, Pilot G2s in yellow, brown and turquoise, a couple of Zebra Sarasa’s in red-black and slate blue, a couple of Uniball Signo 207s in blue and black. All in all, the paper holds up well. The fountain pens had the slightest amount of bleed through with the Ambition being the worst but — it’s a brand new pen so I’ll try it again when it’s not freshly loaded with ink.
So far, I’m satisfied with what Field Notes has to deliver. I’ll have one more saga in this story, I ordered their limited edition State Fair series. Fifty books, each one representing one of the states in a custom box.
Field Notes Unboxing
When I got home today, the Field Notes I ordered Sunday night were waiting for me.
I had ordered the subscription and the first shipment contained two 3-packs of their black Raven’s Wing limited edition, two 3-packs of regular Field Notes, one with graph paper and one mixed. For good measure, I had also ordered a couple of standard 3-packs, one of ruled books and one mixed. Mixed packages contain one each of graph paper, ruled and plain. A couple of goodies were packed in as well, a Field Notes pencil, a Field Notes pen, a Field Notes “General Purpose Band of Rubber” a 1″ button and a decal. Here’s a shot of the contents of the package.
Field Notes
I was talking to a friend about the cahiers I mentioned in the last posting and he turned me on to Field Notes Brand. Apparently these little books were conceived of graphic artist Aaron Draplin. Unlike Moleskines, Field Notes are made is the USA and based on the reviews I’ve read they’re sturdy and well designed. I’ve seen some pictures on the Field Notes Brand website and a host of reviews that discuss the printing on the cover both inside and out.
After watching the preview to this video, I was sold and ordered a subscription. A subscription gets you two 3-packs of the current seasonal offering called Raven’s Wing, two regular 3-packs followed by two 3-packs of each seasonal offering each quarter. Here’s a video that features the selection of colors that were issued over the past year as part of the subscription.
The subscription is $129.00 and while that may sound like a lot of money for some memo books, I’d rather support the people who are making them then the politicians who are screwing us. More when my order arrives.
In Your Pocket
While I like Moleskine cahiers and I have plenty of them laying around, I still like to go the do it yourself route sometimes. I’ll be making about 50 of them fairly soon and I’ve been doing some prototyping to decide on colors and that sort of thing. Here’s a picture of a couple that I’ve made, the one on the left is the newest one. It’s not laying as flat as I’d like simply because I didn’t have any 2-ply thread and I stitched it up with 4-ply.
The one on the right was made in 2009 and I used a Gocco to put the art on the cover. The interior is a Neenah 60 Lb text, the lines were done with a laser printer. The cover Royal Compliments 100Lb cover. These are the same size as Moleskine cahiers, 3 1/2″ X 5 1/2″.
The Art of Silly
I’ve been trying to get my head back in the game after my involuntary hiatus over the past few months and Carla Sonheim’s Art of Silliness workshop popped up just at the right time. The workshop is a series of drawing and other creative exercises. Before beginning the workshop, I hadn’t really picked up a pen on the past six months or so. One of the exercises she had us do is the traditional contour, you know the one, look at the object and draw it without looking at the paper. This exercise is fairly easy to do an normally you draw an actual object that’s laying around the house but in this case, Carla asked us to use a picture of ourselves. All I could find was a picture of my friend Dean. Here’s how it turned out.
I’ve done better in the past and I’m going to blame this on not having picked up a pen in the past several months. That said, everybody in the house knew who this was when they saw it.
Playing with Milk Paint
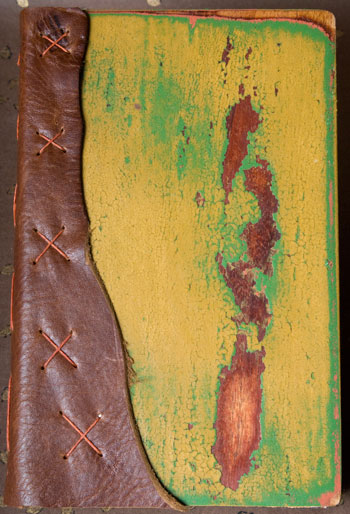
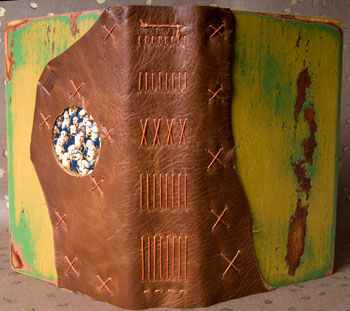
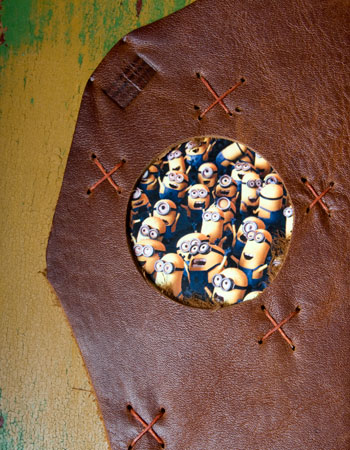
The second book I made this weekend was about 5″ X 8″, about the dimensions of a Moleskine. The book block is 200 lb. Fabriano Artistico and is sewn onto a leather spine. The covers are made from mahogany and finished with milk paint. I cracked the paint by drying each coat in the sun and then putting on another coat quickly, before the first one was completely dry. I used several colors, layer after layer and the distressed the paint by sanding through some of the colors. I’m not sure where it came from, but I had a picture of the minions from the movie Despicable Me laying on my desk and it got included in the binding. Here are the images:
The front cover:
The detail on the spine:
Here’s a close up of the minions:
If you’re interested in trying milk paint for yourself, I get mine from The Old Fashion Milk Paint Company.
Like a bad rash, I’m back
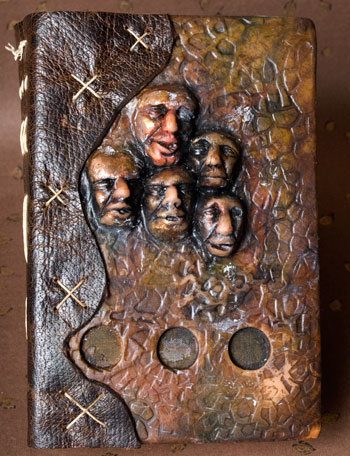
It’s been a while since I’ve posted, without going into details some changes in my Clark Kent life took over. I’m trying to get back into the swing of things and while I was trying to decide what I wanted to make, I found some pages I had torn some time ago. I made a couple of books to fit the pages, the first is made from polymer clay. It’s approximately 4″ X 6″ and the book block is 140 lb. Fabriano Artistico sewn onto a leather spine. The front cover features five faces and below the faces, three cutouts reveal some brass screen sandwiched between the polymer clay layers.
Here’s a shot of the cover:
And the spine:
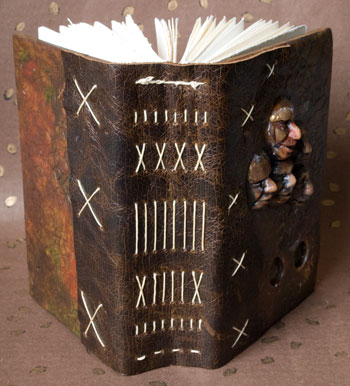
The Book of Briscoe
I was reorganizing my bookshelf last week and stumbled across a book I made back in 2004. It’s a small pocket journal whose dimensions are about 3″ X 4″ and it had fallen behind several other books and been forgotten. I can remember making this book because it turned into something I hadn’t intended when I started making it. Whatever I had in mind when I started this book changed along the way. I was beginning work on the cover and NPR had a remeberance about Jerry Orbach the actor that played Lenny Briscoe on Law & Order, he died in December of 2004. As I continued working on it, he book somehow morphed into The Book Briscoe. One of the things the Briscoe character was famous for was the sarcastic quip he typically uttered early in each episode as a dead body was discovered.
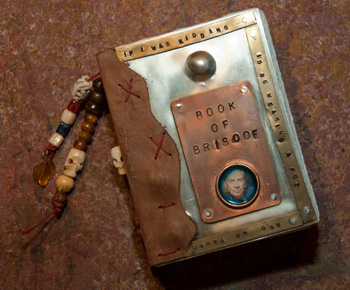
I have a personal favorite and I embossed it into the brass strip that runs around the edge of the front cover, in the event you can’t see it in the photograph, it says; “if I was kidding I’d be wearing a Fez and no pants”. I don’t know that I’d call this a tribute book because that really wasn’t my intent when I made it but it did start me thinking about possibly making a tribute book for Captain Phil Harris. For those who don’t know, Phil Harris was the captain of the fishing vessel Cornelia Marie, a crab boat featured on Discovery Channel’s Deadliest Catch series. Any time I would think about how bad my job was, all I had to do was watch an episode or two of Deadliest Catch to put it all in perspective. Phil Harris died on February 9th, 2010 after suffering a stroke on January 29th. It seems to me that metal would be my material of choice but time will tell as I continue to think about where I want to go with this idea.
The Beauty of the Board
It’s funny how fortuitous happenstance works which is why I suppose it’s called fortuitous happenstance in the first place. A recent collision clogging the freeway forced me to bail onto the surface streets and as it happened my detour required that I drive by the local woodworking shop. Knowing that the wood supply in my studio was getting low I decided to stop and see what they had on hand. I often use wood when binding my journals, even when I make journals out of polymer clay, the back cover is almost always wood. While I like using wood for the very practical reason of workability there’s a wider range of aesthetic reasons that I find it compelling as a raw material.
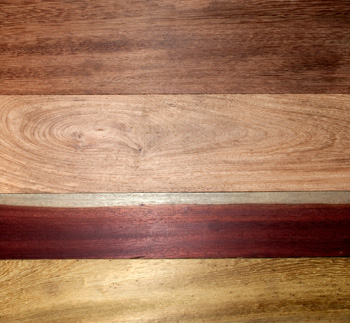
The only problem I have with wood is finding it in the thicknesses I need for bookbinding, I want it no more that 1/4″ thick. Sure, I can order it online but I’m not crazy about buying it sight unseen — I want to be able to see the color and the grain when I choose my wood. Occasionally I’ve been able to find thin hardwood at this store but it’s often hit or miss and something they don’t stock regularly. This time, there was a whole rack of it and I bought four boards in widths of four and six inches — my choices based solely on the interplay between the color and grain of the wood.
Two of the boards were Peruvian Huayruro, one was Bloodwood and one was Brazilian Yellow Heart. In the picture below you can see what I mean about the interplay of grain and color, while the top two boards in the picture are both Huayruro the color and grain patterns are significantly different. I’m already thinking about the books these boards will turn into.
The Kodak Zi8
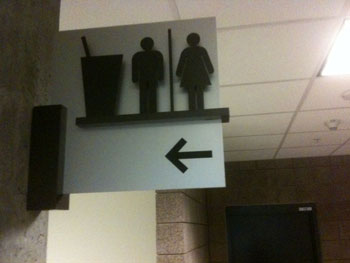
The current crop of HD video cameras are great but I don’t know that I’d want to throw one into the bag I carry my journal around in — it would get trashed in relatively short order. While There’s always a small digital camera for grabbing pictures of things that I want to explore in one way or another later on or for capturing images of things that amuse me for some reason at that particular moment like the sign below.
Documenting your artwork is always a good thing and although I have access to several very good quality video cameras over the past few months I’ve been thinking about getting a pocket size video camera — something that could ride around in my bag and be pulled out at a moments notice and something I could blow off were it lost, stolen or damaged. I wasn’t concerned with super high-def panoramic cinematic excellence , I was more interested in capturing the moment. The Flip series of cameras seemed like the logical choice but as I did some research, I stumbled across the Kodak Zi8 which is a direct competitor to the Flips — in the end I chose it over the Flip for three reasons.
First, the thing I hate about most about these types of cameras is the crappy audio quality; above all the the external microphone jack is what sold me on the Zi8. With it, I can plug a good microphone in and get excellent audio. The second feature of the Zi8 that appealed to me was the ability to use an SD card and a replaceable battery — If I get to the end of the road with storage or juice, a quick swap gets me going again. The third and final factor was video quality, my personal preference in side-by-side comparisons was the Zi8. The day that I chose to see how much it cost on Amazon was the closer, by chance it was $30.00 off that day which made it a $150.00 investment.
Even though I got it around the holidays I didn’t actually have time to tinker with it until I was at PLAY and my goal in using it at PLAY was to see how fast I could throw together event documentation. To put the video below together I intentionally relied on iMovie and one of its default templates instead of the more robust video editors I have access to. While it may be cheesey, the total time to whack this thing together not including the 25 minutes it took to actually upload it to YouTube — about 35 minutes.
If you want to see more information about the Kodak Zi8, Amazon is a good place to start, click on the image below to get there:


